What is a canary deployment?
Let’s start with the origin of the name canary deployment, which comes from an old British mining practice. It’s a little bit cruel. this practice consisted of using “canaries in coal mines to detect carbon monoxide and other toxic gases before they hurt humans.” To make sure mines were safe for them to enter, miners would send canaries in first; if something bad happened to the canary, it was a warning for the miners to abandon the mine.
So how is this comparable to software development and deployments?
Well, when you want to release a new version of an application, you’ll use a canary to make sure the new changes can survive for a broader public. It’s just a matter of defining who the proverbial canary will be. For simplicity, some organizations decide that the canary will be five percent of the traffic. So if something goes wrong with the new changes, only five percent of users will be affected. You can also use more canaries of different colors and sizes in order to increase your confidence in the new changes.
After you feel confident that the new changes are good to go, you roll out the changes to the rest of users. You can now get rid of the canary since it was only used to make sure the miners (your broader audience) wouldn’t be negatively affected by the new changes.
How do you do canary deployments?
As I said before, if you want to do canary deployments, the type of application or infrastructure you’re working on isn’t too important—canary deployments are pretty versatile. Let me give you some specific examples of how to do canary deployments on different infrastructures using only one canary.
Load balancers (Application,Network and Classic)
If you want to do canary deployments with load balancers, you’ll start by having two of them. Load balancer A will receive 95 percent of the traffic, and load balancer B will get the remaining five percent. We’ll use load balancer B for canary deployments, which means we’ll update the servers behind it first. It doesn’t really matter how many servers are behind each load balancer—the important thing is that traffic is split between the load balancers, not the servers.
(Note that you can do canary deployments without load balancers, but it’s easier with them because you can take the server you’re updating out of the rotation.)
When you’re done updating the servers, you monitor and test for a while. If you don’t like the results in load balancer B, you can roll back and finish the release. But if the new changes are good to go, you can proceed to update the servers that are behind load balancer A.
Amazon Web Services (AWS)
If you want to do canary deployments with AWS, you’ll use their service called Route 53, which lets you use weighted records to split the traffic 95/5, like we did before. Or you can use auto-scaling groups, if you don’t want to mess with DNS TTLs.
But if you don’t care that much about having a strict split like that, you can get the same results using Auto Scaling groups (ASG). The magic of ASG is that, even if you have more than one ASG, you only need one Elastic Load Balancer (ELB) because you’ll be attaching all the ASGs to the same ELB. This balances the load between ASGs. So let’s say that one ASG has nine instances (three for each availability zone). A second ASG has only one instance. This gives you a total of ten instances. Then, if we use the second ASG as a canary, you’ll have 1/10 instances for that purpose.
To do canary deployments with ASGs, you apply the same technique as with load balancers but modify it slightly. You update the ASG with the new Amazon Machine Image (AMI)—which has the new changes—and replace the current instance with the new one. You don’t have to worry about downtime because you can launch the new instance first. Once it’s registered in the load balancer, you can drain connections with the old instance and terminate it.
With this technique, rollback is as easy as updating the ASG with the previous AMI and then rotating instances. If you decide to continue with the deployment as is, you just do the same procedure with the other ASG that has nine instances.
Kubernetes
Now with Kubernetes, the approach to doing canary deployments is similar to the one used in AWS, but we use different terminology.
You have a service that could act as a load balancer for pods that are “registered” to the service. You also have “deployments,” which act like ASGs. So in theory, you apply the same techniques. But instead of just explaining it like I did above, let’s learn by practicing.
Containers and Docker
Now, let’s talk about how to do canary deployments with containers and Docker.
Containers are what you use to pack the application code and its dependencies so that you can move your application without too much hassle.
Docker is the company that made containers popular. When someone talks about containers, there’s a good chance they’re referring to the containerized technology that Docker created. Containers are pretty easy to use; all you need to have is a file called Dockerfile, where you define how you build the app and what dependencies it needs. This file is used to create what is called a Docker image, which is later used to instantiate a container.
Since all you need to do to use Docker containers is have the Docker daemon installed, you can move the application through all the environments without fear. Everything that’s needed for your app to run is right there in the container image that you built.
Kubernetes basic theory
Now that we’ve covered how to do canary deployments on different infrastructures, let’s talk about the Kubernetes theory you’ll need to know in order to do a canary deployment.
Deployments
Deployments are the desired state definitions for pods and replica sets. A pod is a group of one or more containers that you run together. Think of a pod like a virtual machine where you “install” and “configure” the application and its dependencies—we both know it’s not actually a virtual machine, but bear with me. A replica set is used to define the number of pods that are running. If for some reason a pod is stopped or destroyed, Kubernetes will create a new one to maintain the desired state.
Deployments then define which container images and versions will run in pods, how many of them will run, what strategy will be used to update pods, and what metadata can be used to interact with other resources.
Services
You can think of services as load balancers for pods. Let me explain: each pod has its own IP address, but if the pod is recreated or there’s more than one, consumers of those pods will need to keep track of those IP addresses. Instead of doing this manually, you could use a service. Services also provide an IP address that consumers can use, but the real benefit is that the service will balance the requests among the pods that are under it.
There are other use cases for services, but for this time, let’s leave it at that since we’ll be using services in our practice example.
Labels and Selectors
Finally, labels and selectors are the metadata that other resources need in order to interact with each other. Labels are key/value pairs that you can define as you want—they’re used to identify objects. Because you can define as many labels as you need, some objects won’t need to have the same labels. So a label selector is needed to select objects using one or more labels.
Labels and selectors are how everything we’ve just discussed is connected. When you define the pods in a deployment, you describe a set of labels that a service will use to balance the load. This is how pods are “registered” into a service.
Canary deployment step by step
Enough theory; let’s get started. Let’s mimic what a developer’s day-to-day work will look like when using Docker and Kubernetes.
0. Prerequisites
Before we start, you need to have the following installed on your computer:
- Docker Edge. If you’ve already installed Docker, you need to uninstall it and then install the Edge version. Why Edge? Simply because it includes a local Kubernetes installation that will make your life easier. It’s supported on Windows and Mac.
- Minikube if you’re using Linux. It’s also supported on Windows, but then Docker needs to be installed in a non-native fashion.
- kubectl is a must because this is how you interact with Kubernetes using the command line. It’s supported on Windows and Mac, too.
Once you have Docker, Kubernetes, and kubectl in your local environment, you’re ready to get started.
1. Create the Docker image for the application
You need an application to deploy in Kubernetes. In my case, I’ll use a .NET Core API template, but you can use an existing application.
Run the following command to create the Docker image version 1.0:
docker build -f HelloWorld/Dockerfile -t
christ/helloworld:1.0 .
Next, run the following command to push the Docker image version 1.0 (this is optional since our case is running locally):
docker push christ/helloworld:1.0
You’ll see that the image is now visible in the Docker Hub:
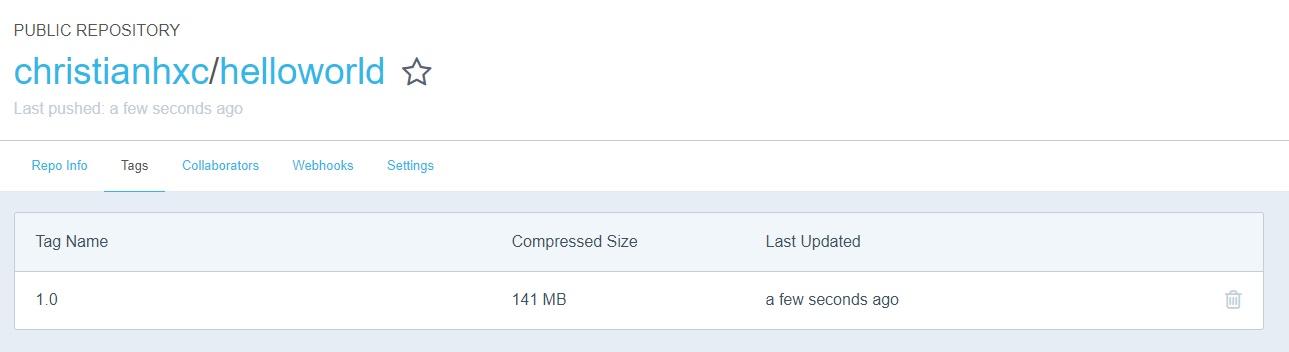
2. Deploy version one to Kubernetes
Now that we have an initial version of the application, we can deploy it to Kubernetes.
Let’s start by creating the service definition file k8s-service.yaml. It should look like this:
apiVersion: v1
kind: Service
metadata:
  name: helloworld
spec:
  type: LoadBalancer
  ports:
  - port: 80
  selector:
    app: helloworld
As you can see in line 8, this service will run in port 80. Note how the service is going to select pods in lines 9–10. It will use the label “app: helloworld” as the selector. The pods that have that label will be included in the service.
Now run the following command to create the service. If the service already exists, it will be updated:
kubectl apply -f k8s-service.yaml
Now it’s time to create the deployment. Let’s create the deployment definition file k8s-deployment.yaml, which should look like this:
apiVersion: apps/v1beta1
kind: Deployment
metadata:
  name: helloworld
spec:
  replicas: 2
  strategy:
    rollingUpdate:
    maxSurge: 1
    maxUnavailable: 1
  minReadySeconds: 5
  template:
    metadata:
      labels:
        app: helloworld
        track: stable
    spec:
      containers:
      - name: helloworld
        image: christ/helloworld:1.0
        ports:
        - containerPort: 80
        resources:
          requests:
            cpu: 50m
          limits:
            cpu: 100m
In this deployment definition file, you see that in lines 15–16 there are two labels: app and track. This is where the magic happens. Pods in this deployment will have the “app:helloworld” label that the service is looking for. The service will balance the load to the two pods (line 6) created by this deployment.
Let’s create the deployment in Kubernetes by running the following command:
kubectl apply -f k8s-deployment.yaml
You can check that pods are running with the following command:
kubectl get pods
Run this command to get the “EXTERNAL-IP” address of the service:
kubectl get service
This is where you will get a static IP address if you’re running on the cloud, but in this case, we’re running a local Kubernetes so the “EXTERNAL-IP” is localhost.
Go to http://localhost/api/values and you should see API Version 1.0 running:
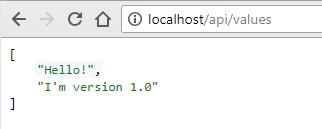
3. Create the Docker image for version two of the application
If you decided to use my application, go to the HelloWorld/Controllers/ValuesController.cs file and change the version in the first method so it looks like this:
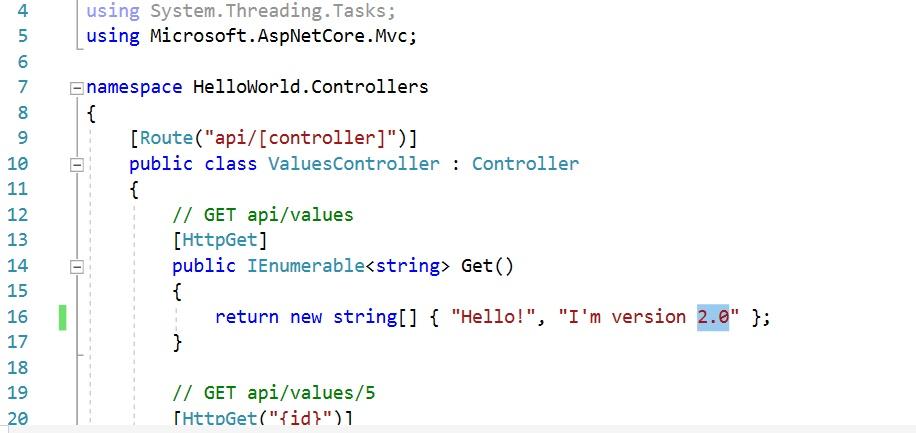
Run the following command to create the Docker image version 2.0:
docker build -f HelloWorld/Dockerfile -t christ/helloworld:2.0 .
Then, run the following command to push the Docker image version 2.0 (again, this is optional as our case is running locally):
docker push christ/helloworld:2.0
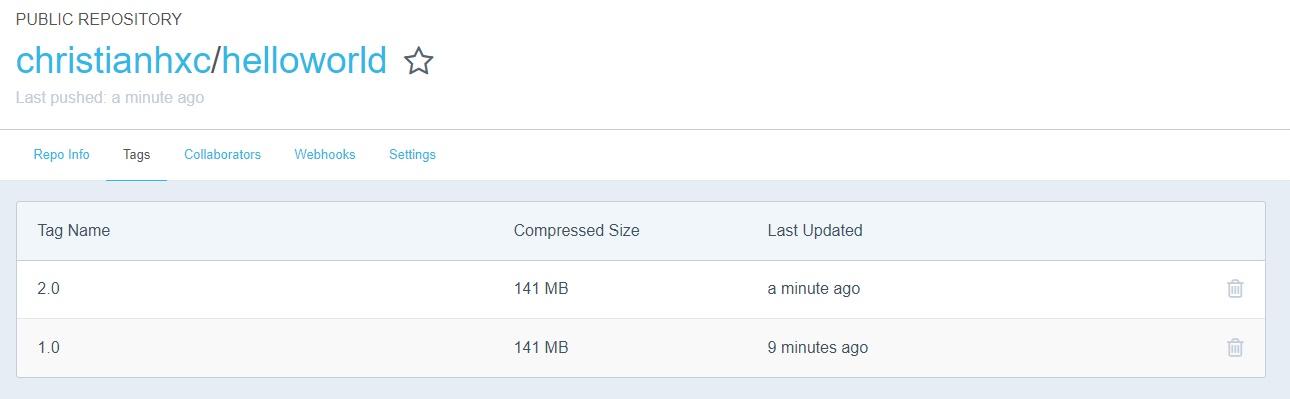
4. Deploy version two to Kubernetes using a canary
Version 2.0 is ready, but we want to deploy it safely.
Let’s create the canary deployment file definition k8s-deployment-canary.yaml. It should look like this:
apiVersion: apps/v1beta1
kind: Deployment
metadata:
  name: helloworld-canary
spec:
  replicas: 1
  strategy:
    rollingUpdate:
      maxSurge: 1
      maxUnavailable: 1
  minReadySeconds: 5
  template:
    metadata:
      labels:
        app: helloworld
        track: canary
    spec:
      containers:
      - name: helloworld
        image: christianhxc/helloworld:2.0
        ports:
        - containerPort: 80
        resources:
          requests:
            cpu: 50m
          limits:
            cpu: 100m
In line 6, you can see that this deployment file is saying that it will create only one pod. As we saw in the “stable” deployment file, you now have two pods running. That means that the canary version will now receive 33 percent (1/3) of all traffic. In line 20, the new Docker version 2.0 is defined, so the new pod will run the version we just created.
5. Monitor version two for a while
It’s time to monitor the new version for a while. You need to have some visibility about performance.
If there are no errors, you’re ready to deploy (see step 6). But if something goes wrong (Murphy’s Law, people), jump ahead to step 7. Even if there were some errors, you don’t need to worry because only 33 percent of the users will be affected by the errors. (If you want to have a lower percentage, you need to add more pods to the stable version. For example, if the stable version created nine pods and the canary version created one, only 10% of the users would be affected.)
6. Roll out version two to the stable
Congratulations! If you’re here, it’s because you decided it’s time to deploy the new version. Now you can get rid of the canary and deploy to your entire audience.
Let’s update the k8s-deployment.yaml file in line 20 to use the Docker image version 2.0, which should look like this:
...
image: christ/helloworld:2.0
...
Run the following command to apply the update:
kubectl apply -f k8s-deployment.yaml
Verify that everything is still running well. You should see the version 2.0 running for all pods.

7. Remove the canary version
If you’re here, it’s because something went wrong. You need to roll back, or maybe you just need to clean up. Remember, we’re only using the canary deployment to reduce the impact on our users.
Run the following command to delete the canary deployment:
kubectl delete -f k8s-deployment-canary.yaml
8. Go back to step 3 to deploy a new version
And that’s it. Every time you have a change that you want to deploy, you need to create a new Docker image version.
Go back to step 3 and make the changes you need, then deploy. Steps 4-7 don’t need to change. A nice thing here is that we’re running everything locally, so you can practice deployments before going to the production environment. You can automate which Docker image version gets deployed. Or you can pass it on as a parameter so that you just replace the new version with a placeholder in the deployment file.
It’s not as difficult as you might think
Canary deployments can be done in different ways with different platforms. But to me, the Docker and Kubernetes way feels more native. And as you saw, it’s not as difficult as you might think. Following these simple and sequential steps will help make your deployments more predictable. Of course, there’s no way to predict application errors, but that’s why you also need to have information about how the application is performing.
You’re not just going to deploy more rapidly as you automate these steps—you’re also going to deploy with more confidence. You’ll always have a chance to test the new version with a small fraction of the users. And if something goes wrong, you can easily roll back. If nothing goes wrong, you can proceed with the full rollout. Then you just shut down the canary version and repeat.
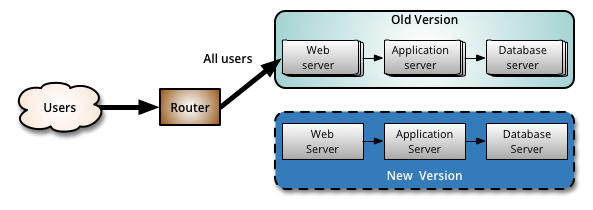
Canary release is a technique to reduce the risk of introducing a new software version in production by slowly rolling out the change to a small subset of users before rolling it out to the entire infrastructure and making it available to everybody.
Similar to a BlueGreenDeployment, you start by deploying the new version of your software to a subset of your infrastructure, to which no users are routed.
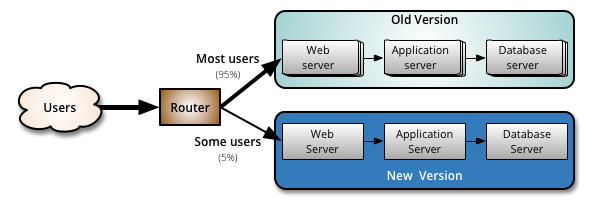
When you are happy with the new version, you can start routing a few selected users to it. There are different strategies to choose which users will see the new version: a simple strategy is to use a random sample; some companies choose to release the new version to their internal users and employees before releasing to the world; another more sophisticated approach is to choose users based on their profile and other demographics.
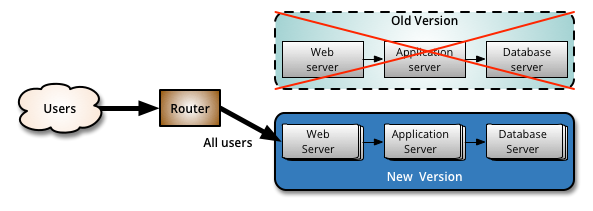
As you gain more confidence in the new version, you can start releasing it to more servers in your infrastructure and routing more users to it. A good practice to rollout the new version is to repurpose your existing infrastructure using PhoenixServers or to provision new infrastructure and decommission the old one using ImmutableServers.
Canary release is an application of ParallelChange, where the migrate phase lasts until all the users have been routed to the new version. At that point, you can decomission the old infrastructure. If you find any problems with the new version, the rollback strategy is simply to reroute users back to the old version until you have fixed the problem.
A benefit of using canary releases is the ability to do capacity testing of the new version in a production environment with a safe rollback strategy if issues are found. By slowly ramping up the load, you can monitor and capture metrics about how the new version impacts the production environment. This is an alternative approach to creating an entirely separate capacity testing environment, because the environment will be as production-like as it can be.
Although the name for this technique might not be familiar [1], the practice of canary releasing has been adopted for some time. Sometimes it is referred to as a phased rollout or an incremental rollout.
In large, distributed scenarios, instead of using a router to decide which users will be redirected to the new version, it is also common to use different partitioning strategies. For example: if you have geographically distributed users, you can rollout the new version to a region or a specific location first; if you have multiple brands you can rollout to a single brand first, etc. Facebook chooses to use a strategy with multiple canaries, the first one being visible only to their internal employees and having all the FeatureToggles turned on so they can detect problems with new features early.

Canary releases can be used as a way to implement A/B testing due to similarities in the technical implementation. However, it is preferable to avoid conflating these two concerns: while canary releases are a good way to detect problems and regressions, A/B testing is a way to test a hypothesis using variant implementations. If you monitor business metrics to detect regressions with a canary [2], also using it for A/B testing could interfere with the results. On a more practical note, it can take days to gather enough data to demonstrate statistical significance from an A/B test, while you would want a canary rollout to complete in minutes or hours.
One drawback of using canary releases is that you have to manage multiple versions of your software at once. You can even decide to have more than two versions running in production at the same time, however it is best to keep the number of concurrent versions to a minimum.
Another scenario where using canary releases is hard is when you distribute software that is installed in the users’ computers or mobile devices. In this case, you have less control over when the upgrade to the new version happens. If the distributed software communicates with a backend, you can use ParallelChange to support both versions and monitor which client versions are being used. Once the usage numbers fall to a certain level, you can then contract the backend to only support the new version.
Managing database changes also requires attention when doing canary releases. Again, using ParallelChange is a technique to mitigate this problem. It allows the database to support both versions of the application during the rollout phase.
Let’s talk about deployments. This topic used to be considered an uninteresting implementation detail, but is now becoming a fundamental element for modern systems. I feel like everyone understand its importance, and is working to build solutions around it, but we are missing some structure and definition. People use different terms for same meanings, or same terms for different meanings. This leads to other people reinventing the wheel trying to solve their problems. We need a common understanding of this topic in order to build better tools, make better decisions, and simplify communication with each other.
This post is my attempt to list and define those common deployment strategies, which I called:
- Reckless Deployment
- Rolling Upgrade
- Blue/Green Deployment
- Canary Deployment
- Versioned Deployment
There are probably other names and terms you expected to see on this list. I’d argue that those “missing” terms can be seen as variants of these primary strategies.
And one final note before we begin: this post is about definitions, methodologies and approaches and not about how to implement them in any technology stack. A technical tutorial will follow in another post. Stay tuned!
Reckless Deployment
a.k.a: Highlander, Simple
TL;DR: Destroy the old, provision the new, don’t care for consequences.
This is the easiest strategy, which means we just nuke everything, and recreate the new version. Usually good for Dev/Test scenarios or very low impact applications. Not much to add here…

Rolling Upgrade
a.k.a: Gradual Deployment
TL;DR: Introduce new version of the code into the existing deployment, gradually ramping up while decommissioning old code.
This is a basic strategy that is about adding new code into an existing deployment. The existing deployment becomes a heterogeneous pool of old version and new version, with the end goal of slowly replacing all old instances with the new instances. The terms ‘Instance’ and ‘Pool’ can mean different things depending on your technology stack (VM, Container, Process, etc…).

Health and monitoring
An important aspect of this strategy is health checking and monitoring. The whole point of gradually introducing new code is to be able to control damages in case of an unexpected issues with the new code, and in order to do that we have to know how the the new version is doing. Therefore, health checking and monitoring is essential.
Roll back
If we determine that the deployment is not going well, we could stop the rollout, and even cancel and undo the deployment (a.k.a roll back).
Backward compatibility
Since new code and old code live side-by-side under the same roof, users might be routed to either one of the versions arbitrarily, so backward compatibility should be a major concern for you if you are using this strategy.
Closely related
You might be thinking about doing some smart routing of users to allow some users to consistently get a specific version, or to expose only a subset of users to new version – You are on the right track, but then I wouldn’t call it a Rolling Upgrade anymore. Keep reading to see where I’m going at.
Blue/Green Deployment
a.k.a: Red/Black, Staged deployment, Swapping Slots
TL;DR: Spin up a new separate deployment for the new version, without affecting the current one. Test the new version, and once ready start routing users to the new version.
This is the safest strategy, and is used by many for production workloads. To provide that safety, we won’t touch anything that’s currently running, and provision an entire copy of the application, or the module we are upgrading aside. It’s up to you to decide on the scope of deployment (or scope of isolation), for example: Do you recreate the entire system, or just the updated module? Do you create a separate Load Balancer for the new version deployment, or add a new rule to the existing Load Balancer? Do you share configuration between version? These are just some of the questions that might come up, and it’s up to you or your tools to decide.
One thing is for sure – the new version should be completely isolated from the current version deployment, this is in contrast to Rolling Upgrade where, for the duration of the upgrade, we had a heterogeneous deployments consisting of old and new code. As a consequence, backward compatibility is not mandatory here.
Once the new version is live, you should test it however and how long you need to. Since the current version is still live and serving, there’s no rush to finalize the deployment. At this point users are still unaware of the update.
When you get confident enough with the quality of the version, you would start routing users to the new version instead of the old version. It can be all users at once (a.k.a cut-off or cut-over), or gradually add more users to the new version.

Draining
A common practice is “draining” the old deployment before transitioning, meaning allowing current active sessions to end naturally, and only start new sessions using the new version.
Switch Back
Usually you will want to keep the old one around even after the full transition had completed, just to be sure you can undo and switch back to the old working version easily.
Stage
A common variant of this strategy is staged deployment/slot swapping. The scope of the deployment (or scope of isolation) in this case is the entire application (meaning we have an entire copy of the whole system on stand-by). In this practice we always have 2 copied of our application infrastructure around, even if an upgrade is not currently in progress. One environment is the production, and the other is pre-production, usually called ‘stage’. We can use the stage regularly for stuff like QA/UAT/Repros/CI. We always deploy to stage, never to production. Therefore, the stage will always be ahead of prod, representing the latest candidate for production. As in regular Blue/Green, we should test and validate stage without affecting prod, and once we are good for deployment, we simply swap the routing between the two environments, meaning stage becomes prod and prod becomes stage. This is usually done using updating DNS records (but not necessarily). Again, we can easily swap back if something bad happens.
Closely related
You might be thinking about exposing that Stage environment (or that new “green” deployment) for actual users to try. This is a good idea, which I call Canary Deployment, It’s described next.
Canary Deployment
a.k.a: Ringed Deployment, Feature toggling, Dark features, Silent launch, A/B testing, Testing in production.
TL;DR: Deploy the new version into production alongside the old one, carefully controlling who gets to use the new version. Monitor and tune the experiment while gradually expanding it’s population.
This is the holy grail of deployment practices. Also the hardest to achieve.
It can be seen as an advanced usage of one of the previous strategies: Use any strategy that you’d like to introduce new code into the system, with the key difference of allowing real users to use the new version in production. Naturally, you wouldn’t want all users to get all new, premature features, so you’ll want to control which users get which pieces of the new version. This can be implemented at the load balancing/proxy layer, using application settings, at runtime, or any other way that works for you. The basic and common implementation of Canary uses Blue/Green Deployment with the addition of smart routing of some users to the new, “green” version.

More advanced implementation will go beyond the enhanced Blue/Green technique, and deploy at a more granular level. Canary is all about control and supervision, the more granular you can control your components, the more advanced your canary deployment is.
More monitoring
We already mentioned this before, but I’ll restate it again with even greater significance this time. None of these advanced patterns will work without excellent monitoring in place. For Canary, consider going beyond the basic vitals checks, perhaps look at performance or user experience metrics. With good observability, Canary will let you move from thinking about deploying a functioning version, to deploy the best version.
A/B Testing
An advanced variant is shipping multiple different versions into production, and running experiments on real users and their reaction to each version. Now we digress from the topic of deployment strategies to more about mature product planning approaches, but I mention this here because the deployment strategy is the crucial foundation of any of these advanced business related strategies and therefore are often closely related.
Dark features
An extreme version of Canary Deployment/Testing in Production is shipping turned off features to production, and turning them on selectively for some users (think beta/preview testers). To work like this your system needs to be designed in a very modular way, such that the unit of deployment is a feature, and the application is dynamically composed of features that can be individually toggled. A dedicated release management system for managing which features are active for which users is not a bad idea in this case.
Versioned Deployment
TL;DR: Always keep all versions alive, while letting the user choose which version to use
I wasn’t sure if I this one belonged here, since it’s borderline an architecture pattern or API design pattern, rather then a strict deployment method. Still, I think it has the potential to affect your deployment approach so I do list it as a deployment strategy here.
What if you didn’t have to choose between versions, and you could always keep all versions running in production? This appealing strategy is especially popular amongst API developers. In this example, all API versions will always be available (never remove a working version) and the user will choose which version they want to work with. This is in contrast to every other strategy where we (not the user) decided which version users will use.
The obvious complications are the extra capacity to host legacy versions, and maintaining shared data sources across versions. But if you care enough about backward compatibility, and can spare the extra capacity, the benefits will outweigh these complications.
As for the deployment of this strategy, it’s very straightforward: just deploy the new version. Since everything is always explicitly versioned, it’s easy to just trow out a new versioned deployment, there are no consequences. The beauty is that users have to explicitly ask to use the new version (or any version), so your deployment platform doesn’t have to care about transitioning users between versions.

API Design
I won’t go into specific examples here because this post is not about designing APIs. But I will suggest that if you are interested in this strategy, take a look how Microsoft designed their Azure Resource Manager (ARM) API. It is a wonderful example of this pattern, and for the design of REST APIs in general.
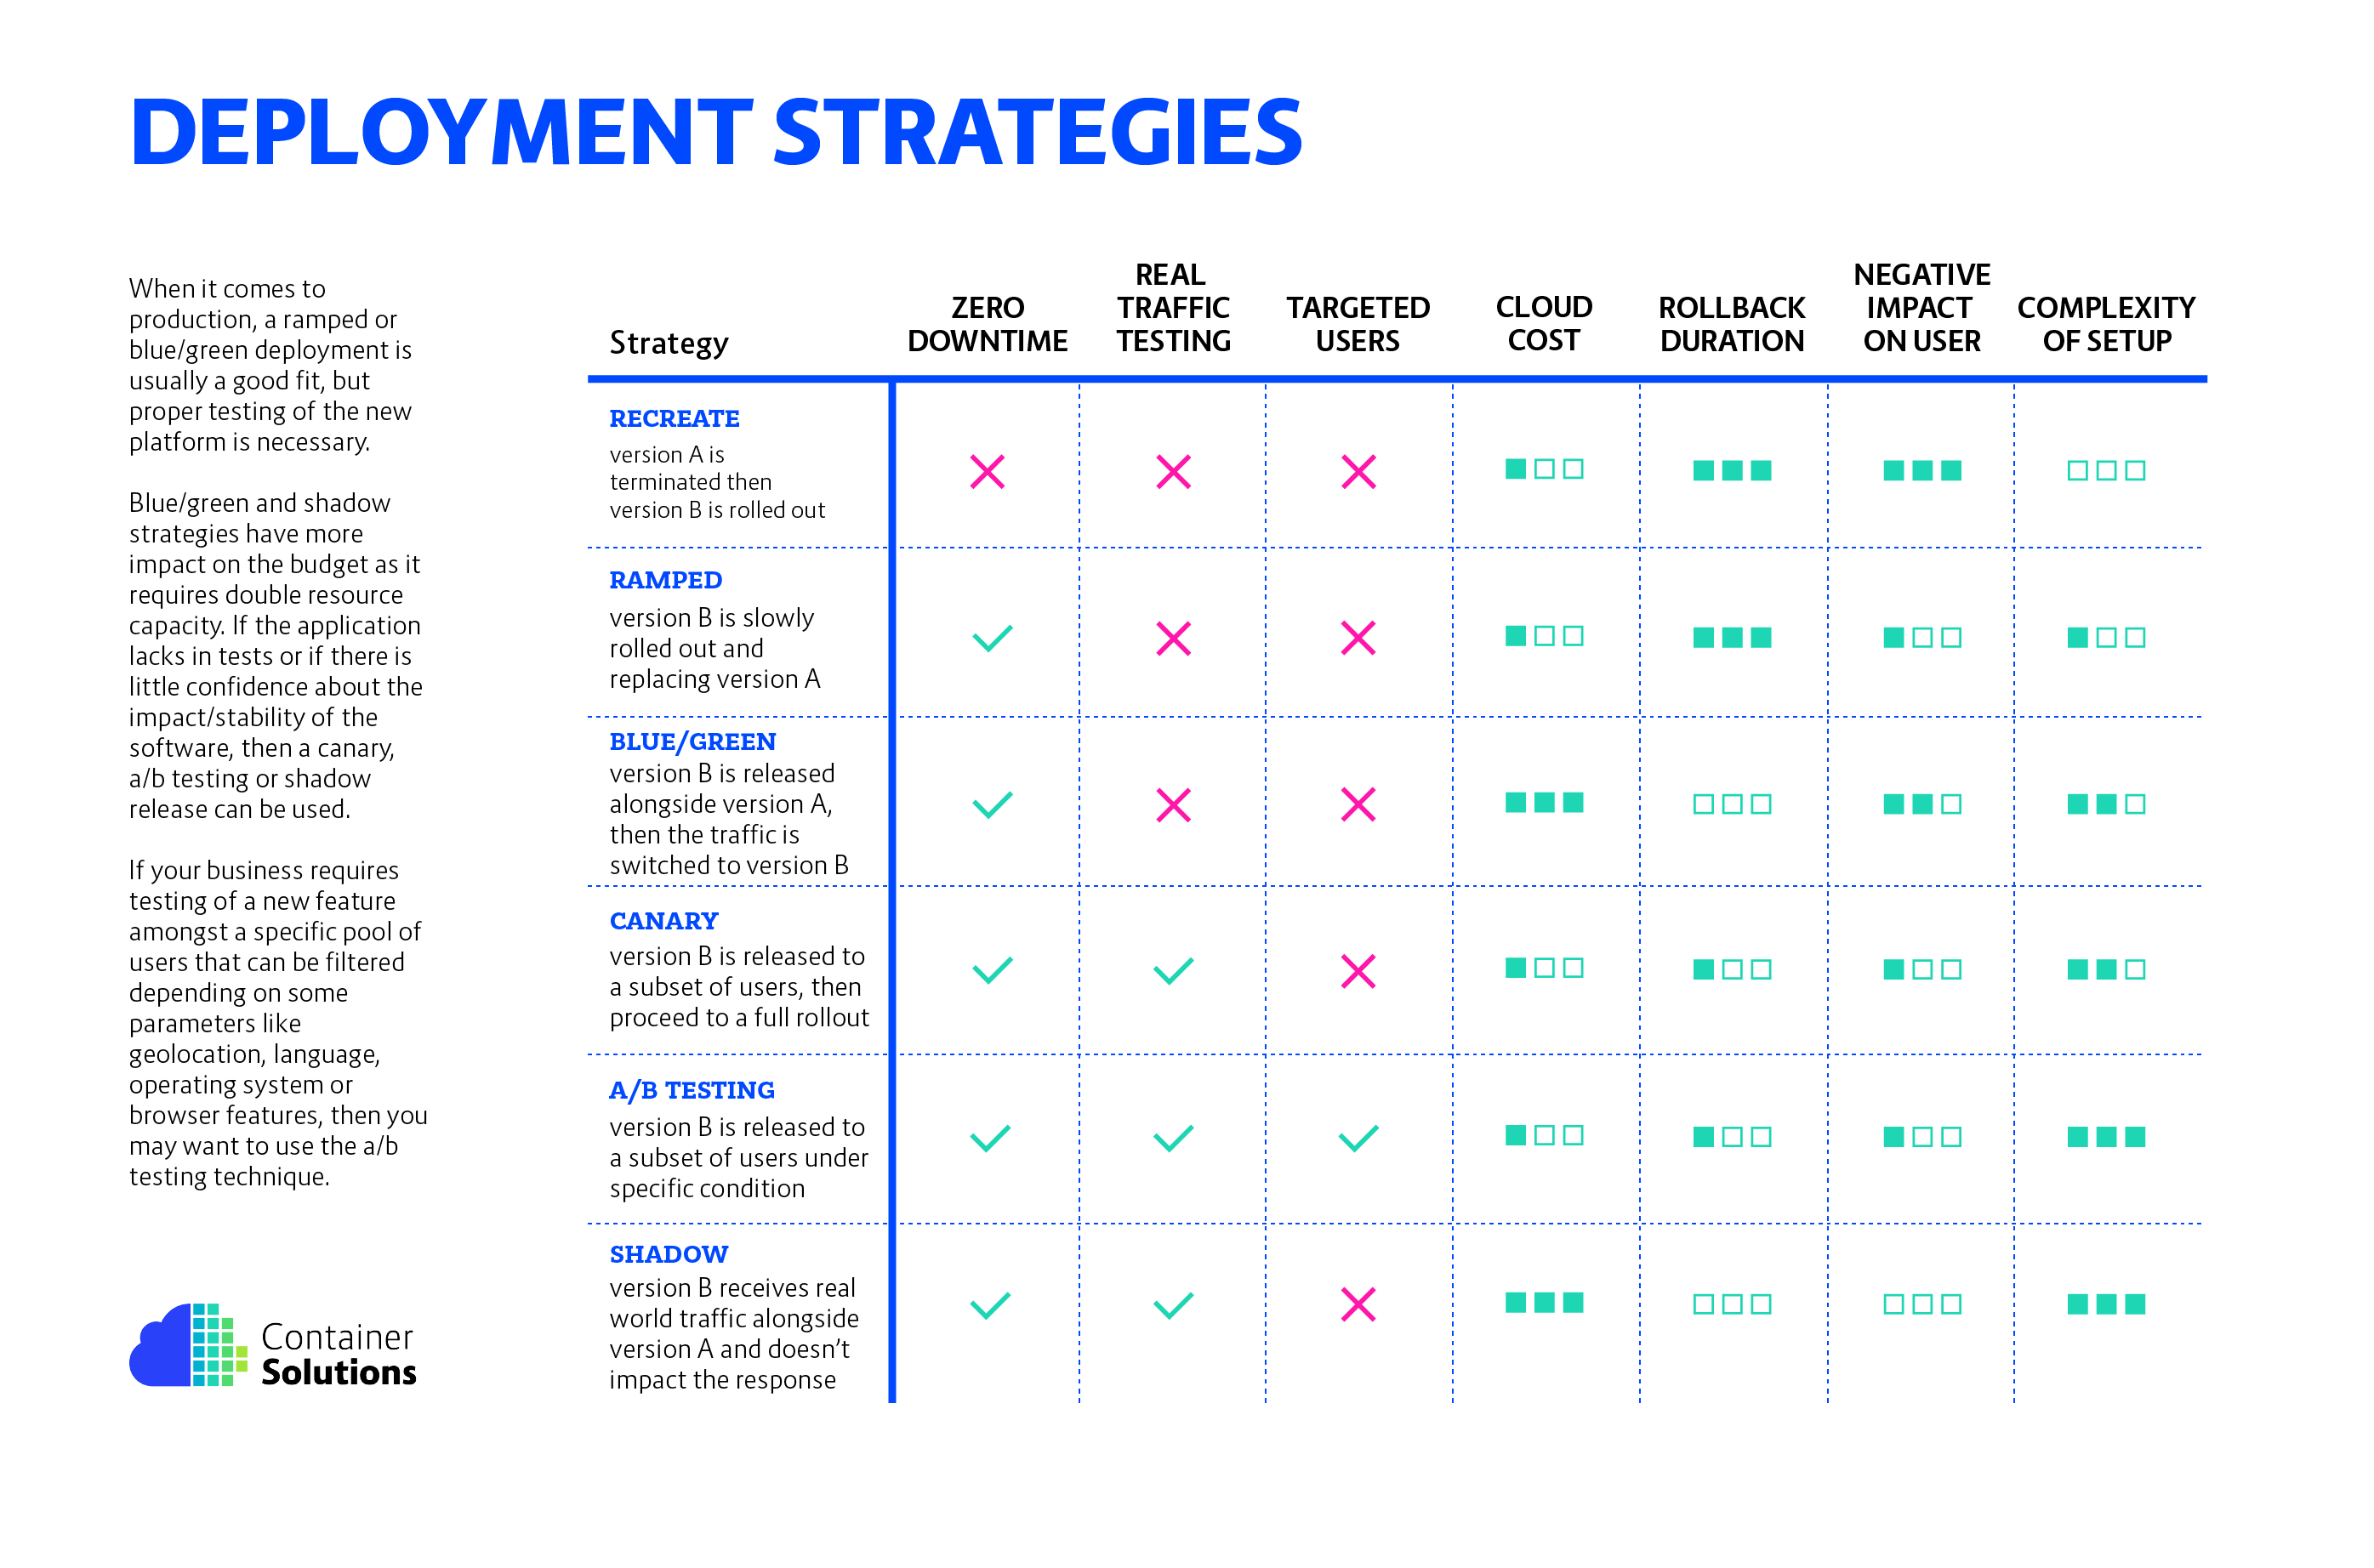
There are a variety of techniques to deploy new applications to production, so choosing the right strategy is an important decision, weighing the options in terms of the impact of change on the system, and on the end-users.
In this post, we are going to talk about the following strategies:
- Recreate: Version A is terminated then version B is rolled out.
- Ramped (also known as rolling-update or incremental): Version B is slowly rolled out and replacing version A.
- Blue/Green: Version B is released alongside version A, then the traffic is switched to version B.
- Canary: Version B is released to a subset of users, then proceed to a full rollout.
- A/B testing: Version B is released to a subset of users under specific condition.
- Shadow: Version B receives real-world traffic alongside version A and doesn’t impact the response.
Let’s take a look at each strategy and see which strategy would fit best for a particular use case. For the sake of simplicity, we used Kubernetes and tested the example against Minikube. Examples of configuration and step-by-step approaches on for each strategy can be found in this git repository.
Recreate
The recreate strategy is a dummy deployment which consists of shutting down version A then deploying version B after version A is turned off. This technique implies downtime of the service that depends on both shutdown and boot duration of the application.

Pros:
- Easy to setup.
- Application state entirely renewed.
Cons:
- High impact on the user, expect downtime that depends on both shutdown and boot duration of the application.
Ramped
The ramped deployment strategy consists of slowly rolling out a version of an application by replacing instances one after the other until all the instances are rolled out. It usually follows the following process: with a pool of version A behind a load balancer, one instance of version B is deployed. When the service is ready to accept traffic, the instance is added to the pool. Then, one instance of version A is removed from the pool and shut down.
Depending on the system taking care of the ramped deployment, you can tweak the following parameters to increase the deployment time:
- Parallelism, max batch size: Number of concurrent instances to roll out.
- Max surge: How many instances to add in addition of the current amount.
- Max unavailable: Number of unavailable instances during the rolling update procedure.

Pros:
- Easy to set up.
- Version is slowly released across instances.
- Convenient for stateful applications that can handle rebalancing of the data.
Cons:
- Rollout/rollback can take time.
- Supporting multiple APIs is hard.
- No control over traffic.
Blue/Green
The blue/green deployment strategy differs from a ramped deployment, version B (green) is deployed alongside version A (blue) with exactly the same amount of instances. After testing that the new version meets all the requirements the traffic is switched from version A to version B at the load balancer level.

Pros:
- Instant rollout/rollback.
- Avoid versioning issue, the entire application state is changed in one go.
Cons:
- Expensive as it requires double the resources.
- Proper test of the entire platform should be done before releasing to production.
- Handling stateful applications can be hard.
Canary
A canary deployment consists of gradually shifting production traffic from version A to version B. Usually the traffic is split based on weight. For example, 90 percent of the requests go to version A, 10 percent go to version B.
This technique is mostly used when the tests are lacking or not reliable or if there is little confidence about the stability of the new release on the platform.

Pros:
- Version released for a subset of users.
- Convenient for error rate and performance monitoring.
- Fast rollback.
Con:
- Slow rollout.
A/B testing
A/B testing deployments consists of routing a subset of users to a new functionality under specific conditions. It is usually a technique for making business decisions based on statistics, rather than a deployment strategy. However, it is related and can be implemented by adding extra functionality to a canary deployment so we will briefly discuss it here.
This technique is widely used to test conversion of a given feature and only roll-out the version that converts the most.
Here is a list of conditions that can be used to distribute traffic amongst the versions:
- By browser cookie
- Query parameters
- Geolocalisation
- Technology support: browser version, screen size, operating system, etc.
- Language
Pros:
- Several versions run in parallel.
- Full control over the traffic distribution.
Cons:
- Requires intelligent load balancer.
- Hard to troubleshoot errors for a given session, distributed tracing becomes mandatory.
Shadow
A shadow deployment consists of releasing version B alongside version A, fork version A’s incoming requests and send them to version B as well without impacting production traffic. This is particularly useful to test production load on a new feature. A rollout of the application is triggered when stability and performance meet the requirements.
This technique is fairly complex to setup and needs special requirements, especially with egress traffic. For example, given a shopping cart platform, if you want to shadow test the payment service you can end-up having customers paying twice for their order. In this case, you can solve it by creating a mocking service that replicates the response from the provider.
Pros:
- Performance testing of the application with production traffic.
- No impact on the user.
- No rollout until the stability and performance of the application meet the requirements.
Cons:
- Expensive as it requires double the resources.
- Not a true user test and can be misleading.
- Complex to setup.
- Requires mocking service for certain cases.
To Sum Up
There are multiple ways to deploy a new version of an application and it really depends on the needs and budget. When releasing to development/staging environments, a recreate or ramped deployment is usually a good choice. When it comes to production, a ramped or blue/green deployment is usually a good fit, but proper testing of the new platform is necessary.
Blue/green and shadow strategies have more impact on the budget as it requires double resource capacity. If the application lacks in tests or if there is little confidence about the impact/stability of the software, then a canary, a/ b testing or shadow release can be used. If your business requires testing of a new feature amongst a specific pool of users that can be filtered depending on some parameters like geolocation, language, operating system or browser features, then you may want to use the a/b testing technique.
Last but not least, a shadow release is complex and requires extra work to mock egress traffic which is mandatory when calling external dependencies with mutable actions (email, bank, etc.). However, this technique can be useful when migrating to a new database technology and use shadow traffic to monitor system performance under load.
Below is a diagram to help you choose the right strategy:
Depending on the Cloud provider or platform, the following docs can be a good start to understand deployment:
- Blue-Green Deployment – When deploying a new version of an application, a second environment is created. Once the new environment is tested, it takes over from the old version. The old environment can then be turned off.
- A/B Testing – Two versions of an application are running at the same time. A portion of requests go to each. Developers can then compare the versions.
- Canary Release – A new version of a microservice is started along with the old versions. That new version can then take a portion of the requests and the team can test how this new version interacts with the overall system.
